Introduction to AWS ELB
ELB stands for Elastic Load Balancing and what the Elastic Load Balancer does is, it divides user requests or traffic of the application among different EC2 instances in different availability zones. As one application can have multiple EC2 instances on which different web or database servers can be hosted.
The main benefit that comes out of this is the capacity to handle the failures as if one server is down then the request will go to the other server which is up automatically.
Health Monitoring
The load balancer continuously monitors the health of its registered instances and make sure that it routes traffic only to the healthy EC2 instances.
Whenever the load balancer detects that an instance is not healthy, it immediately stops sending traffic to that instance, and then resumes sending traffic to that instance only when it finds out that the instance is back to its healthy state again.
Internet or Internal facing Load Balancer
When you create a load balancer, you must choose whether to make it an internal load balancer or an Internet-facing load balancer.
The nodes of an Internet-facing load balancer have public IP addresses. The DNS name of an Internet facing load balancer is publicly resolvable to the public IP addresses of the nodes. Therefore, Internet facing load balancers can route requests from clients over the Internet.
On the other hand, the nodes of an internal load balancer have only private IP addresses. The DNS name of an internal load balancer is publicly resolvable to the private IP addresses of the nodes. Therefore, internal load balancers can only route requests from clients with access to the VPC for the load balancer.
Note
Both Internet-facing and internal load balancers route requests to your instances using private IP addresses. Therefore, your instances do not need public IP addresses to receive requests from an internal or an Internet-facing load balancer.
TYPES OF LOAD BALANCERS
Users cannot remember different/multiple endpoints or IP addresses of different servers running behind. They need one endpoint which they can hit and ultimately that endpoint will route and map the request to the appropriate server and that single endpoint can be created by load balancers.
We get a single endpoint with a load balancer and there are different types of load balancers available.
Hardware Load balancer
They are physical machines in datacenters. E.g.- F5, Cisco ACE, etc.
Software based Load balancer
For E.g.- Apache Http service, Nginx, HA Proxy, etc.
NGINX Plus and NGINX are used by many developers for load balancing solutions for high-traffic websites such as Dropbox, Netflix, and Zynga.
When you include NGINX Plus as a load balancer in front of your application and web server farms, it increases your website’s efficiency, performance, and reliability.
To set up these types of load balancers with AWS, we need to launch AWS EC2 instances and then need to set up these services and then behind the scene it will route the request. For that, we will have to manage the instances on our own and need to install the OS as well.
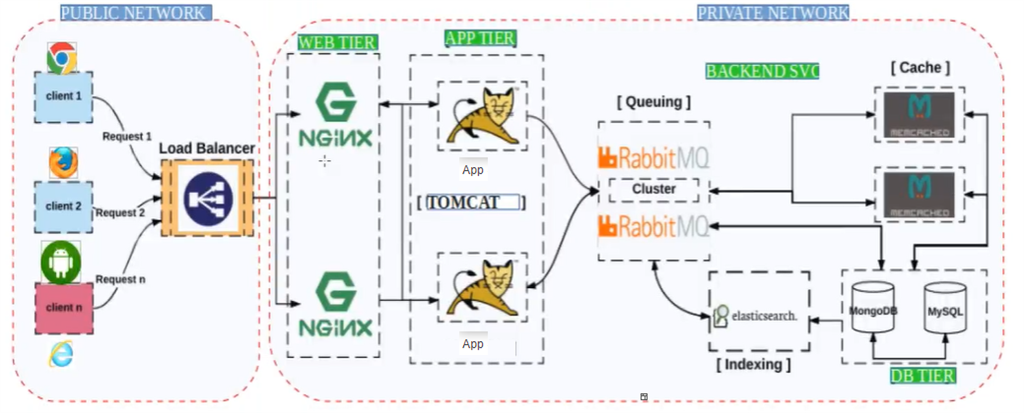
So, suppose if we have only one NGINX, then it can receive the request and can route it to any of the tomcat app servers and will thus act as a software-based load balancer. But with only one NGINX we have a single point of failure.
Cloud based Load balancer
In AWS we have AWS ELB, so instead of setting up a load balancer on your own, we can use ELB service.
We generally do load balancing on the PROD environment.

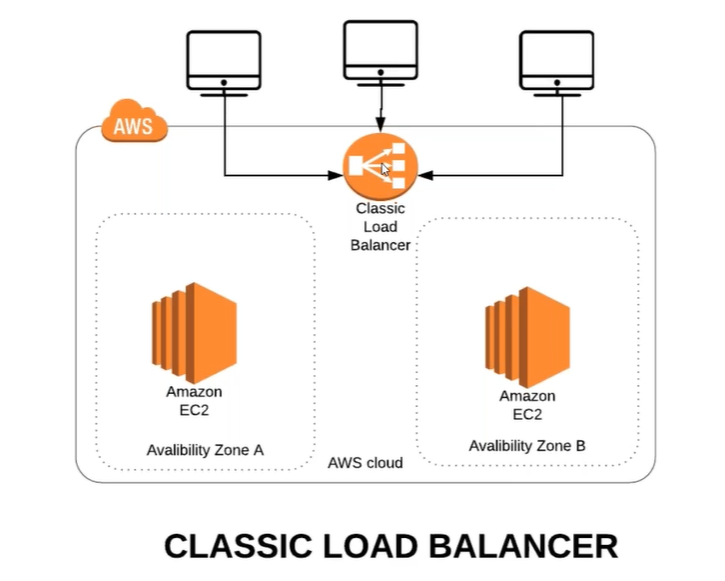
Classic Load Balancer provides basic load balancing across multiple Amazon EC2 instances.
Application Load Balancer is best suited for load balancing of HTTP and HTTPS, i.e., for web sites and they can also route the request to a particular path also. Like web01/images or web02/videos etc.

For example, google.com/mail goes to Gmail and google.com/images goes to google images means request routing to another set of instances depending on the request.
Network Load Balancer is best suited for load balancing of Transmission Control Protocol (TCP), User Datagram Protocol (UDP) and Transport Layer Security (TLS) traffic where extreme performance is required.
LOAD BALANCER PORTS
We have 2 types of ports here
Frontend Port
It Listens from the user requests on this port. E.g. 80,443,25 etc.
Backend Port
Services running on OS listens on this port. E.g.: 80,443,8080 etc.
VERTICAL AND HORIZONTAL SCALING
What if this instance goes down or CPU is full, or the site becomes inaccessible. So, to handle such kind of issues we do CLUSTERING.
Clustering is a grouping of similar services/apps/storage etc. and the main benefits are high availability and zero downtime and Scalability.
For example: Suppose normally our application has 1000 users and now for some sale or festival around 100000 users are expected, then the existing resources/instances cannot handle such heavy load. So, for this, we need to add more resources and we can do it by scaling either vertically or horizontally.
Vertical scaling means that you scale by adding more power (CPU, RAM) to an existing machine.
- In case our laptop is running short of RAM then adding more RAM means vertical scaling.
- Changing your instance from t2.micro to t2.large is an example of Vertical Scaling.
But there is always a limit to vertical scaling, we cannot scale vertically limitlessly as the systems where we are scaling vertically may have some limitations and it may also cause downtime.

Horizontal scaling means that you scale by adding more machines into your pool of resources. Suppose we had 5 web servers and we add 2 more, this is horizontal scaling.
Web and DB server Example
If your application has multiple tiers, where web servers must be connected to the Internet and database servers that are only connected to the web servers, we can design an architecture that uses both internal and Internet-facing load balancers. Create an Internet-facing load balancer and register the web servers with it. Create an internal load balancer and register the database servers with it.
The web servers receive requests from the Internet-facing load balancer and send requests for the database servers to the internal load balancer. The database servers receive requests from the internal load balancer. This can be seen in the image below

PREREQUISITES OF CREATING ELASTIC LOAD BALANCER
There are some prerequisites of creating load balancer and they are mentioned as below,
- Choose any two Availability Zones you will use for your EC2 instances.
- Launch at least one EC2 instance in each Availability Zone.
- Then ensure that the security group for your EC2 instances allows HTTP access on port 80. Now to test the web server, copy the DNS name of the instance and verify whether browser displays the default page of the web server or not.
HOSTING SAMPLE APP IN WEB SERVER
As we have seen the prerequisites for creating the load balancer. So now let’s quickly set up the web server.
In one of my previous article, we have already seen that how we can set up an EC2 instance with CentOS 7 and how we can host a sample application.
So here also we are going to do the same thing and are going to launch 1 instance.
The difference is just that we are going to use Ubuntu OS this time to make it a bit different in terms of commands. Otherwise the entire process is same, this will not cover every small step here once again.
Few points to note here, to set up the application we have used The Card Portfolio Template and we have used Ubuntu Server 18.04 to set up our EC2 instance.
We have launched the one EC2 instance in us-west-1b availability zone.

We have added the tag card-web01 for our EC2 instance.

We have given the security group name as card-web-sg.

We have used the key pair name as card-kp, this will be used to login to the instance.

And post this set up launched the instance.

Once the instance is up and running then, first we will login to the instance and after switching to root user will run the below mentioned commands.
ssh -i "Downloads/card-kp.pem" [email protected]
sudo -i
apt update
apt install wget unzip apache2 -y
wget https://www.tooplate.com/zip-templates/2109_the_card.zip
unzip 2109_the_card.zip
cp -r 2109_the_card/* /var/www/html/
systemctl restart apache2
Finally, after restarting the Apache2 service, we will copy the public IP address of this EC2 instance from AWS and paste it on browser to see that our site is up and running.

What if the above server goes down ?
So, for that we would like to cluster it and thus we need a minimum of 2 instances (multiple instances), as above.
CREATING AMI OF WEB SERVER
Now one way to create another instance exactly like web server card-web01 is to set up all the services and configurations like we did earlier, or the other way could be to launch the clone of card-web01 server.
That clone is called Image or AMI (Amazon Machine Image). Sometimes, we have a lot of configurations, so in those cases it is really beneficial to set up AMI.
NOTE: Once you have a service created, tested and approved by everyone then you should create AMI.
As of now we have only 1 web server i.e. card-web01. So now let’s create an image of this instance as shown below.

This instance card-web01 has only root volume, but if it would have other volumes added also then those would be also part of the AMI.
NOTE: When we create AMI then the instance gets rebooted and there is a downtime, but if the instance is already in the cluster then we are good.
We can also select the No Reboot option, and this will prevent the instance from rebooting, but it will be a slower process.

So, add the Image name and description and hit create Image and then you are good to have an AMI. We can see that AMI has been created successfully as shown below.

LAUNCH INSTANCE USING AMI
As we have our AMI ready, so now it’s time to launch another instance using this AMI.
So, go to Launch Instance -> Under My AMIs, you will see your AMI.

Select the AMI and follow the same steps as we followed while creating first web server card-web01 and select the same security group and same key pair.Our previous instance of card-web01 was in us-west-1b availability zone, so here for another web server, I have chosen another availability zone i.e. us-west-1c.

And I followed the rest of steps as I did earlier and we can see that both our instances/web servers are up and running.

And one web server is in us-west-1b zone and other in us-west-1c zone. Now let’s copy the public IP of card-web02 server and see if it is up or not.

It’s up and running.
Note: While setting up card-web01 in we had to restart the apache2 service , but here we did not do this and our website is up and running. This is because in the card-web01 server we have started this and the AMI which we created using card-web01 server already had those configurations set up.
CLUSTERING WEB SERVERS USING ELB
Now we can see that we have two web servers set up , but to access them we have to access via their separate end points. So now we are going to set up a cluster using ELB.
Go to Load Balancer section -> select Application Load Balancer.
For this we need Target Group.
Target group is a group of instances or we can say that it is used in load balancer so that request can be routed to one or more registered instances.
Go to Load Balancing section -> Target Groups -> Create Target group.

I have named my target group as card-web-tg.

We can see that our target group has been crated successfully. Now, next is to select the instances that we want to group in the target group.
Registering instances to target group
For that go to targets tab -> Click on Edit -> select the instances.

And click on Add to Registered. Please note that the port mentioned here is the BACKEND PORT, this is the port no of the services running on the web servers and we are running apache service which runs on port 80.
So now click on Add to registered and then hit save.

As we are now done with setting up the target group, so let’s now created Application Load Balancer.
Creating Application Load Balancer
For Application Load Balancer (only for HTTP and HTTPS traffic), we are going to set up front end port and the backend target group. So, it is going to route the request to that particular target group.
Now, go to Load Balancing section -> Load Balancers -> Create Load Balancer -> Create Application Load Balancer.

A Few Points to Note here
- Name is what we are going to see in the URL, when hitting the load balancer.
- We are going to use internet facing load balancer as it is going to receive the HTTP requests.
- We have to select minimum 2 availability zones.
Next, we will continue with the default options and will create a new security group for the load balancer too.
Creating security group for the load balancer

Setting up routing for the load balancer
For this we will select the existing target group, which we just created.

So, review all configurations in the end and hit Create.

We can see now that our load balancer is active. AWS ELB works on a round robin algorithm.
Load balancer actually distributes your traffic 50%-50% and that’s how the load is balanced.

Now what if web01 is down?
In this case load balancer is only going to send requests to web02. So, it is going to send request to only live servers, but how is load balancer deciding which instance is up or which is not?
So, the health of the instances is checked by the target group and load balancer is not actually responsible for checking the health. We can edit the health check setting of the target group as well.

Checking status of instances in Target Group

We can see that it is showing both instances as unhealthy, even when I can individually access the instances and they are up and running.
This is happening because of the security group of our web servers’ card-web01 and card-web02.
Configuring security group of web servers
Now we need to allow the security group of load balancer in the inbound rule for port 80 of the security group of web servers i.e. card-web-sg.

This means that now our web servers can receive requests on port 80 from the load balancer and load balancer will receive HTTP requests from the user on port 80.
Now, we can see that the health of our web servers is healthy now.

Accessing Load Balancer via URL
As the health of both our instances is good, so now I will simply copy the DNS name of the ELB and will see if it works. card-web-elb-1006025513.us-west-1.elb.amazonaws.com

I would say this is among the best article I’ve read.
You nailed it from beginning to end. To write this you may have worked for research.
King regards,
Boswell Cannon