Git is a distributed version-control system for tracking changes in source code during software development. It is designed for coordinating work among programmers, but it can be used to track changes in any set of files.
Distributed Version Control System
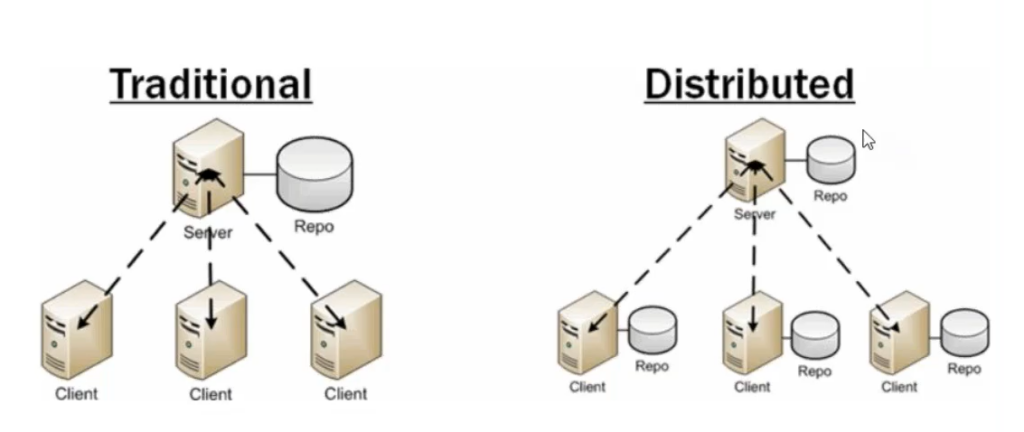
In distributed version control system, it acts like a centralized version control system which host a service and every client will have a copy of the repository.
- Git is a distributed version control system
- Git is a Tree history storage system
- Git is content tracking management system
- Git is fully distributed and support non linear development
There are many Git Repository hosting platforms available like github, bitbucket. In this blog we will have a look at github.
How does Git really works?
Well, we talked about how Git works in layman’s terms but technically, it is much more sophisticated. So far, we have set up local repository. Let’s say that we made some changes to our code or created new files, and we want other developers to have it too, then we need to push these changes to the remote repository. Once these changes are updated on the remote repository, other developers can use the git pull command to bring those changes to their local repository.
There are few key steps one must go through to push changes a remote repository. Let’s first understand what a commit is.
What are Commits?
At a time, we can have one or multiple files changed. We don’t push entire files to remote repository, instead we push changed code which also makes file transfer over networks faster. A commit logs a change or series of changes you have made to a file. A commit has a unique SHA1 hash which is used to keep track of files changed in the past. A series of commits comprises the Git history. A commit object is more complex than it looks but basically it contains file change meta data, the name of the author of the commit, a timestamp of when the commit was made, and the previous commit’s hash. Based on this information, a hash of a new commit is generated. If any information inside a commit changes, hash will also change. If you are familiar with blockchain technology then you can think of the commit history as being like the blockchain where the commits are the blocks
Whenever you use git pull or git push, you only fetching or sending these commits to remote repository. Git on remote repository server then merges these commits to the its local repository (our remote repository).
Your local repository has three different virtual zones or areas viz. working area and staging area and commit area. Working area is where you create new files, delete old files or make changes to already existing files. Once you are done with these changes, you add these changes to staging area. The staging area is also sometimes called the ‘Index’. Once you have completed your changes, the staging area will contain one or more files which need to be committed. Whenever you create a commit, Git will take changed code from staging area and make a commit which it then moves to commit area. Unless you use git push command, these commits won’t be sent to remote repository.
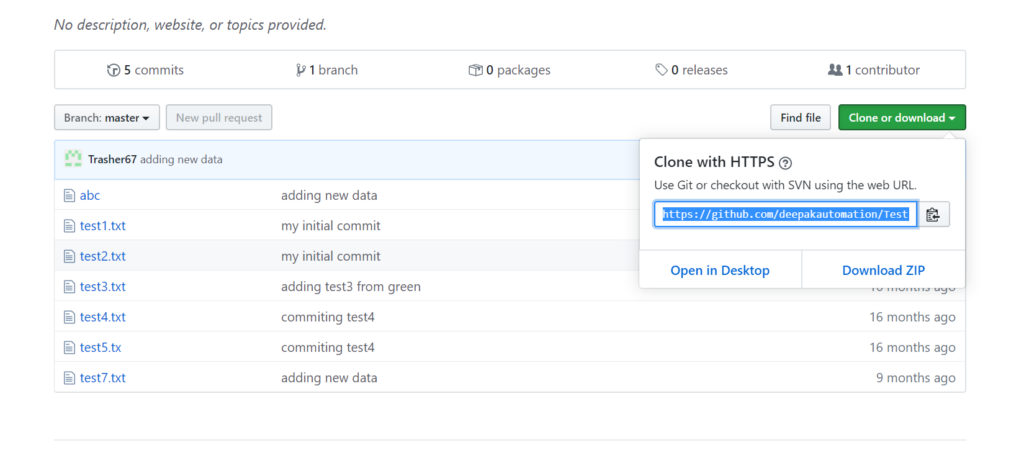
Create a public repository(free) on github.com.
Let’s clone a repository

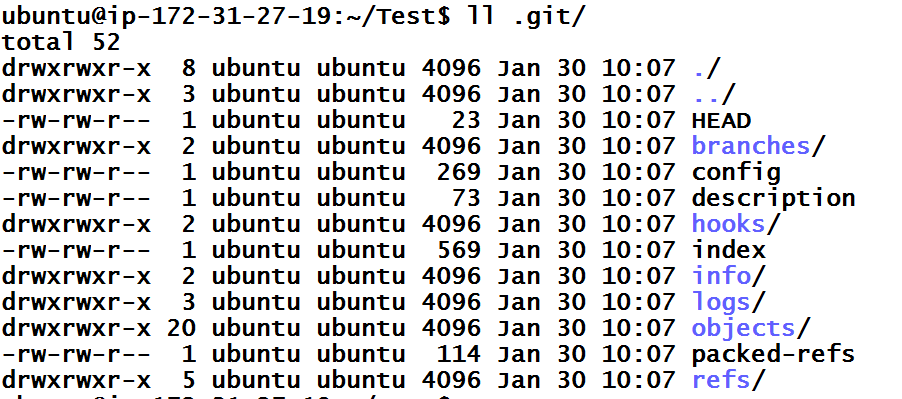
Inside the cloned repository there will be a .git folder which will contain all the repository configurations.
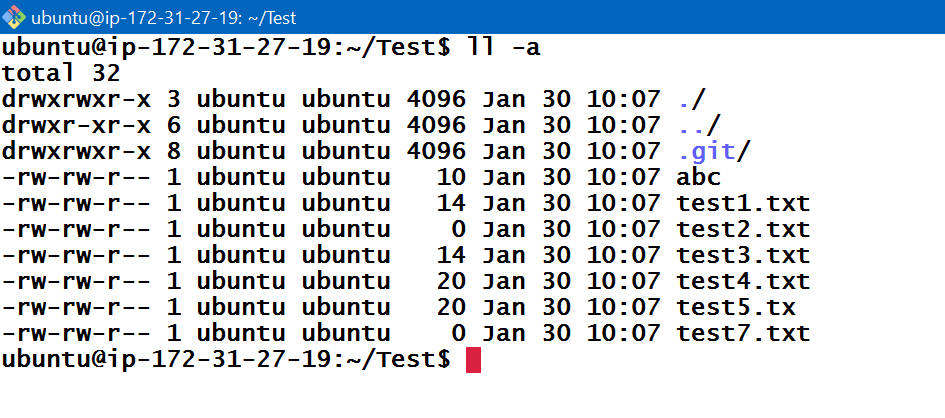
Let’s proceed ahead into learning git more. Let’s create few files inside the repository.

Let’s do a git add . now. Git add creates an index for the commit process later.
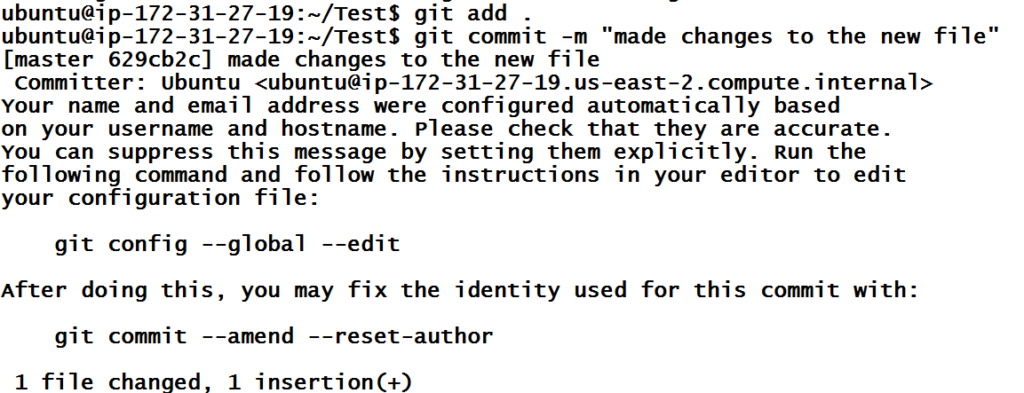
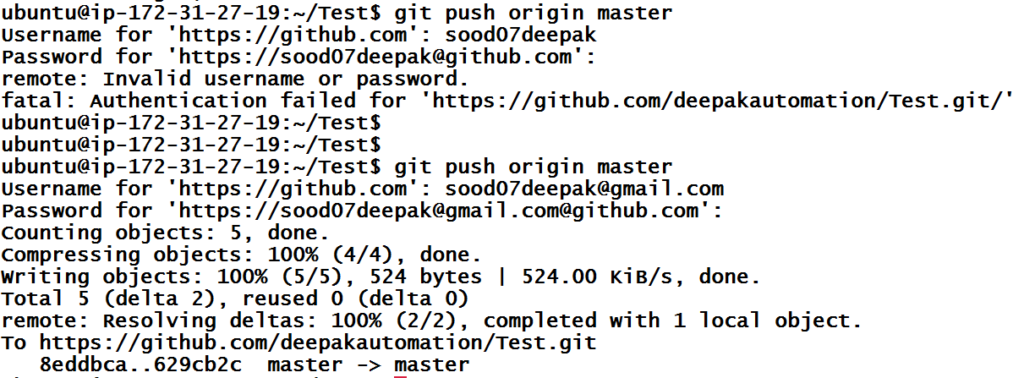
Here git commit will track all files i.e it will take a picture of the current state of all your files and then store that information. git commit is done locally, but let’s say if I want to push I will execute the below command. push is used to sync it to the remote repository.
Similarly, make few more changes and commit it.
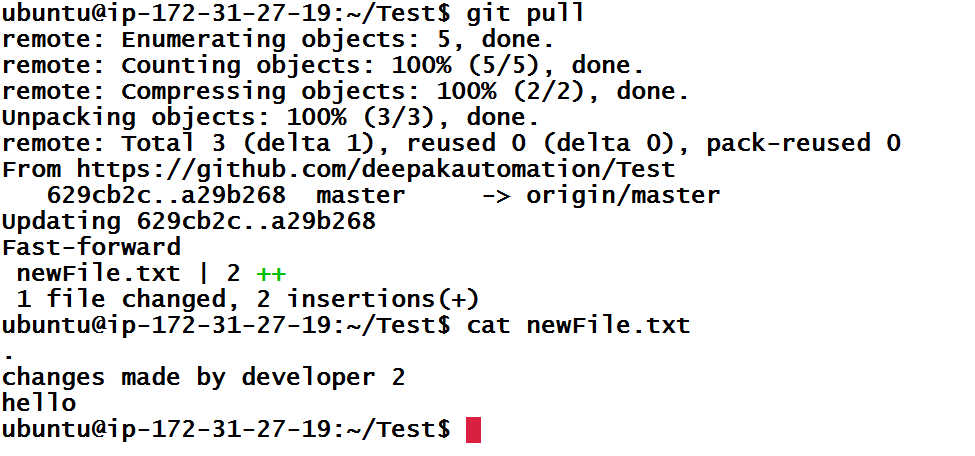
Now let’s assume, some other user has made some changes and we want to pull his changes on our local machine. So as to achieve this scenario, I am making changes on the github repository directly.
Now pulling the changes on our local machine.
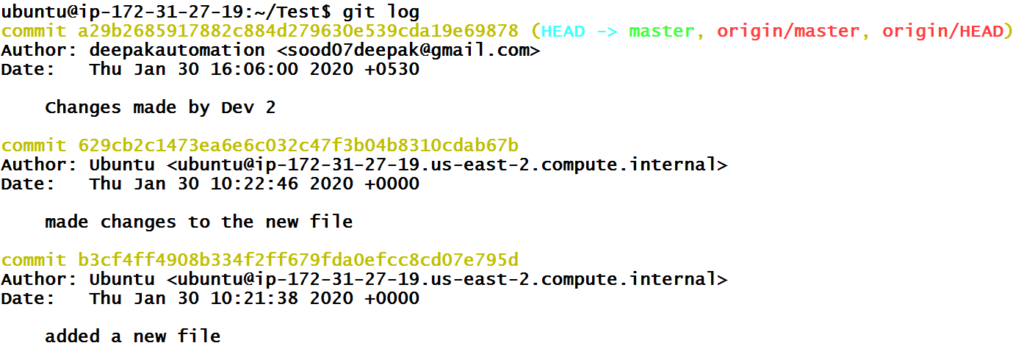
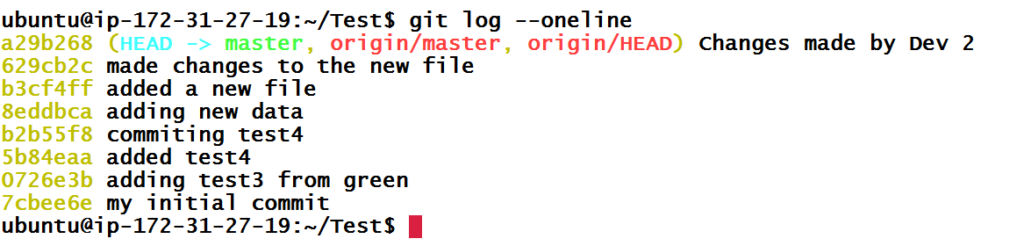
So as to get the history of the commit, we can use below commands.
Git Reset/Revert
If we want to move back to the previous commits, then we have 2 options:
– git reset
– git revert
git reset will bring us back to the previous commit(s) and the current commit will be lost, however will be present in the reflog. In case of revert, git revert will bring us back to the previous commit(s) and the current commit will not be lost, instead a new commit will be created denoting that revert has taken place.
git reset --soft a29b268 will remove all commits after commit a29b268 and will bring all changed code after that into the staging area. You don’t need to use the full hash of a commit. All commits after this commit are then removed from git history.
git reset --mixed a29b268 will remove all commits after commit a29b268 and will bring the changed code after that to the working area. This command is the same as git reset a29b268.
git reset --hard a29b268 will remove all commits after commit a29b268 and destroy all changed code after that. This will also remove changed file in working or staging area. Hence git reset --hard HEAD is also used to get rid of all the changes whether it is inside the working area or the staging area. One important thing to remember is that all untracked files (newly created files) will not be removed.
This command resets the Git history which can be potentially be dangerous. Hence, make sure that you are only altering commits that are not yet pushed to the remote repository so that other developer won’t face any problems.
Branches
Until now we have been dealing solely with the master branch branch as we saw in some commands. But what is a branch? Git is all about commits. At any point in time, we are always in some branch.
As you saw in Git history using git log, a Git history is a series of commits linked together forming a chain. A branch is nothing but that chain with a name. When we add new commit, it gets pushed to the top of that chain. The top commit is now HEAD.
HEAD is just a pointer to the last commit in a currently checked out branch (the current branch we are in). Hence whenever I say HEAD of master branch, it doesn’t mean, master branch doesn’t have different HEAD than other branch. It means HEAD when we are in master branch. So bear with me on this one.
But a branch does not have to remember all commits. It has to remember only last commit and then that commit is linked with another commit and so on. You can visualize a branch as tuple of a commit and branch name.
When we initialize a repository, master is the default branch without any commits. Once we make a commit, that commit becomes the HEAD. Once we start adding more commits, HEAD will point to whatever is at top of the chain and branch has to only remember that commit. Hence a branch is nothing but a tuple of branch name and HEAD commit.
When we create new branch, we are creating a new tuple with a branch name and a commit. The commit for the new branch is taken from the last commit of another branch. If we are inside master branch and we instructed Git to create new branch, Git will pick up last from master branch. Once we switch the branch, HEAD will point to the last commit of the current branch.
But why do we need branches? Well, it’s a standard development practice in small to large organizations that every developer should work on his/her own branch. Once he/she is done with development, he/she can test the code before it gets merged in master branch which could be the production branch. That way, the accidental deployment of buggy code can be prevented.
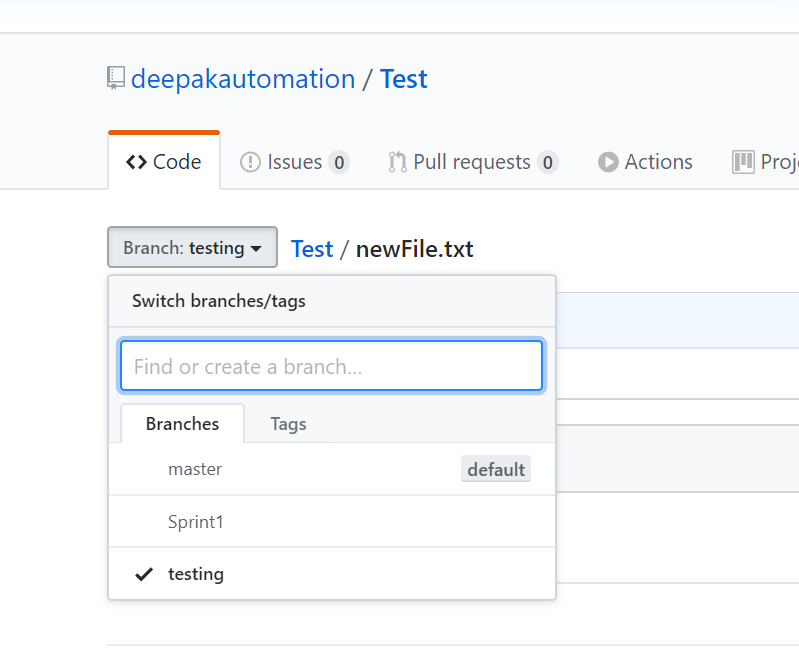
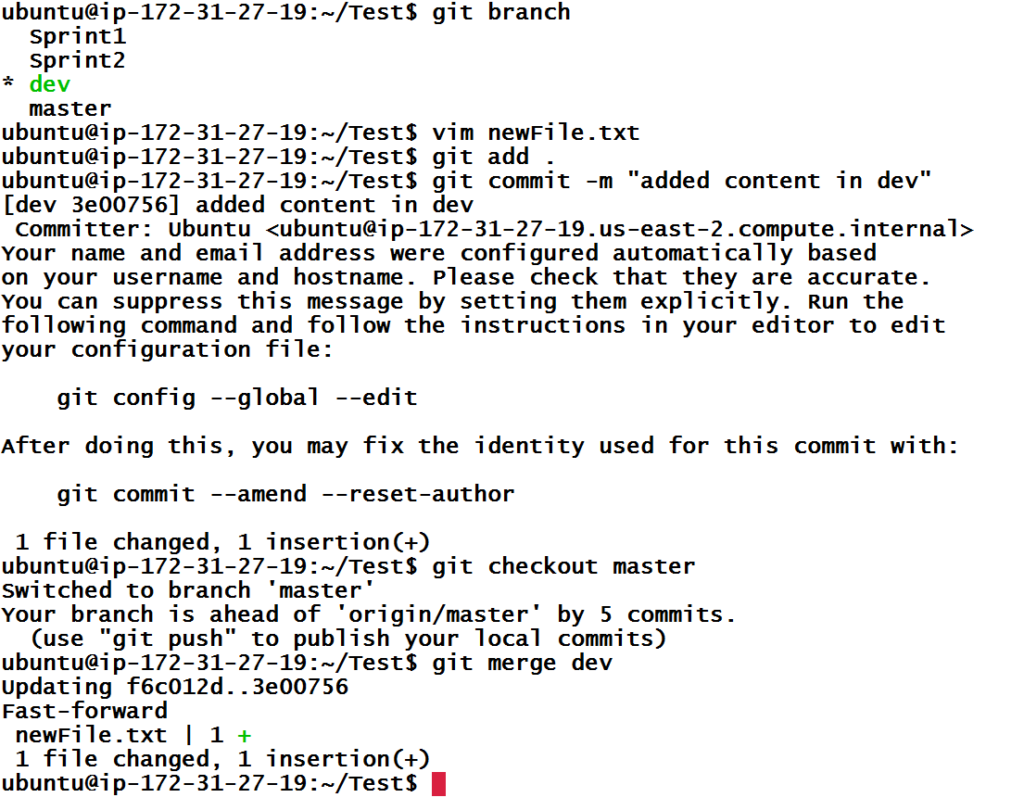
Alright. Let’s create a branch with the name Sprint1. To create a branch, first we need to make sure we are inside the correct branch with the begin with. Right now, we are inside master branch and you can verify that by looking at your terminal or by checking how many branches are present in the repository. The one with asterisk is the branch you are currently in.
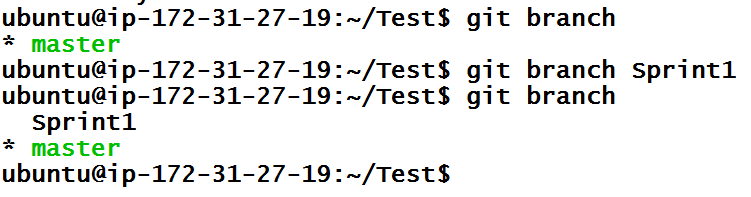
This will create Sprint1 branch but we are still under master branch. To enter inside Sprint1 branch, we need to use checkout the branch using the command below.

The above two steps can be carried out at once using git checkout -b Sprint1 command which will create and checkout branch at the same time.
Let’s see the branch history for Sprint1.
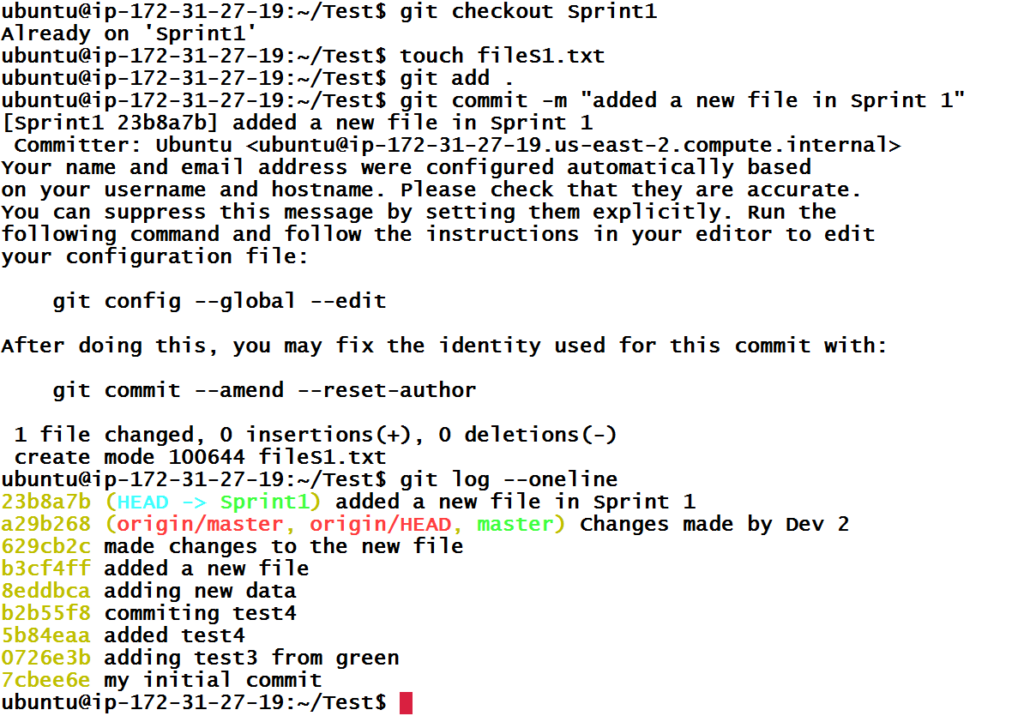
Now, if we check the history of Sprint1 branch, we will see a new commit at the top which will be the HEAD.
You might want to push that branch to the remote repository. This could be necessary but if your company is running some sort of automated tests using continuous integration, then pushing a branch might be a good idea.
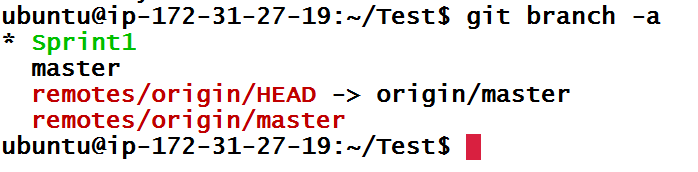
To check all local and remote branches, use git branch -a. So far there is only one remote branch.
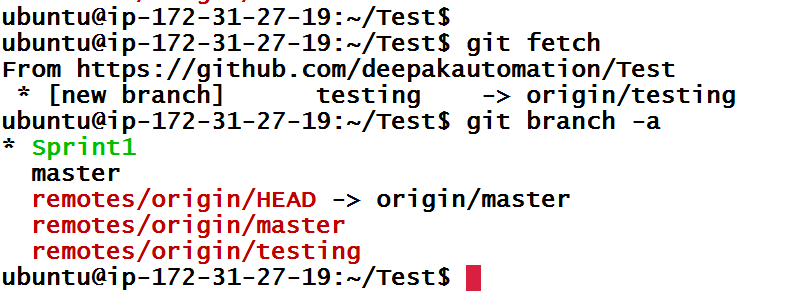
Git fetch
You can use git fetch at any time to update your remote-tracking branches. Let’s create a remote branch from GitHub.
git fetch really only downloads new data from a remote repository – but it doesn’t integrate any of this new data into your working files. Fetch is great for getting a fresh view on all the things that happened in a remote repository.
Due to it’s “harmless” nature, you can rest assured: fetch will never manipulate, destroy, or screw up anything. This means you can never fetch often enough.
You remember how we set upstream for local master branch using git push origin master command? We need to do the same for the Sprint1 branch. If this branch doesn’t exist on the remote repository, it will be created.
If a remote branch already exists with a different name than you want to track with the current branch, then use command git branch --set-upstream-to origin/Sprint1 instead and then you just have to use git push.

Let’s say that continuous integration test on remote Sprint1 branch ran well and you (or admin) now have to merge changes made in your Sprint1 branch to the master branch. Merging happens between two branches, technically, it is careful mixing of commits of two branches.
Since, we need all changes made in the Sprint1 branch to sync with the master branch, we have to checkout master branch:

When we checkout out the master branch, we are referencing a different Git history because our HEAD is different. That means the state of the files associated with this HEAD would be different. Hence Git changes the content of the files in the repository according to that state.
Since we are now in the master branch, we must pull code from the remote repository before doing anything, always do this. This way, we don’t miss out on any development happened on master branch (done by other developers) whilst development of Sprint1 branch.
Now, we have to merge the dev branch into the master branch. To check if any branches ever merged with current branch which is master, you can use the command below.

From the above output, it is clear that no other branches were ever merged in master branch. Since we are already under the master branch, following command will merge the Sprint1 branch with the current branch.
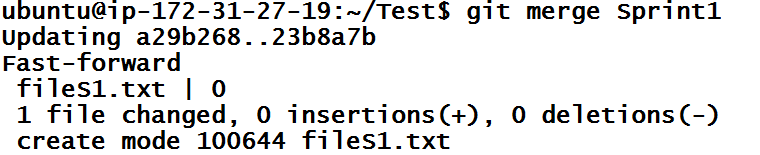
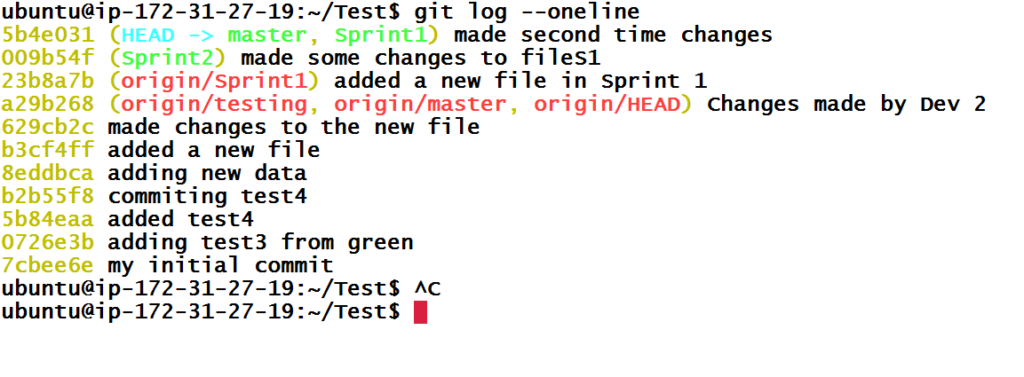
The above command also shows files that were changed. You can also verify merger by executing git branch --merged command. If we see git history of master branch now, we can see any commits made in the Sprint1 branch appears in master branch.
Now we just have to sync the local master branch with the remote one. This is done using the same old git push command.
If we are done with Sprint1 branch and we don’t need it anymore, then we can just delete it using the command below. This will delete local Sprint1 branch only.

You can delete multiple branches in one command using git branch -d branch1 branch2 ....
To delete remote Sprint1 branch as well, you need to use the command below.
git push –delete origin Sprint1
Detached HEAD state
You may comes across a situation when your git shows a detached head state message in the console. This happens when you are not in a branch. As we discussed, a branch is nothing but a registered pointer to a commit in the repository. When we are in a detached state, the state of the repository is pointing to a commit in history but that pointer is not saved. You can test it with git checkout command. (git checkout commit-id)
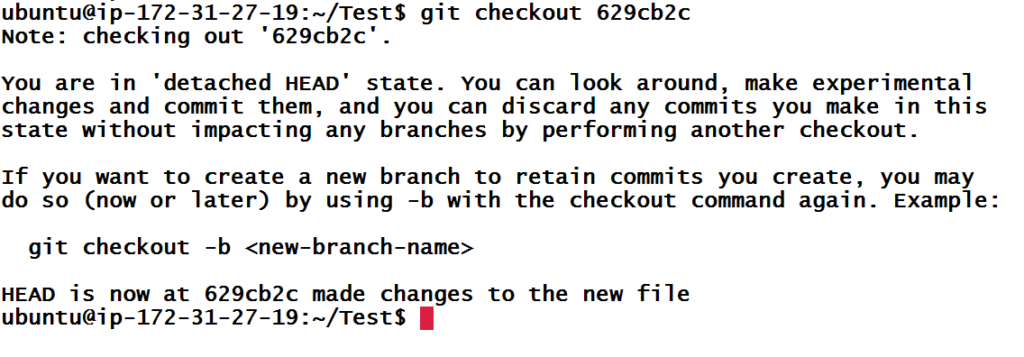
Let’s create a unnamed branch from commit 629cb2c using the command below.
Let’s have a look at the git branch
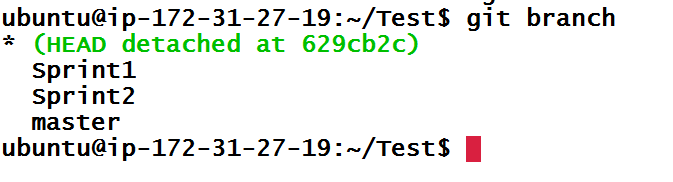
We can see from git status, that we now have a new branch (HEAD detached at 629cb2c and we are currently in that branch.
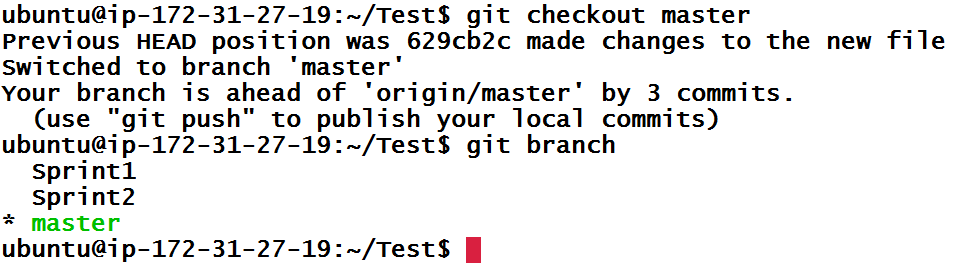
Being in detached state is not a good news, but we can fix it. You can do pretty much anything in this branch like being in a named branch but once you are done with your changes, you should not checkout other branch. Because if you did that then Git won’t remember detached HEAD branch. Also, we can create a new branch from detached head branch like any other branch we used to do. Now checkout to master.
Stashing changes
Stashing means secretly hiding something and when we stash changes, they are stored in safe place. This is where git reset --hard contradicts. Git hard reset will get rid of changes in tracked files while stash will do the same but it can save the changes in secret location. These changes can be re-applied if needed.
Let’s change something on the master branch.
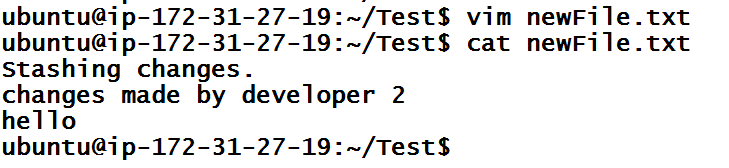
We made some changes in subtract.js but we remembered that we are on the wrong branch. We have to checkout dev branch because we were supposed to make changes there.
From previous lessons, we handled situations like this when we created the commit. In this case, we can try to switch the branch but Git sometimes doesn’t allow it as our current branch has some uncommitted work. Hence, it’s better to get rid of uncommitted work completely (from one branch) and redo it in the other branch. But that would be too painful.
Hence, what we have to do is to get rid of the changes but save those changes in some location (like a commit but not exactly a commit). This is done using the command below.
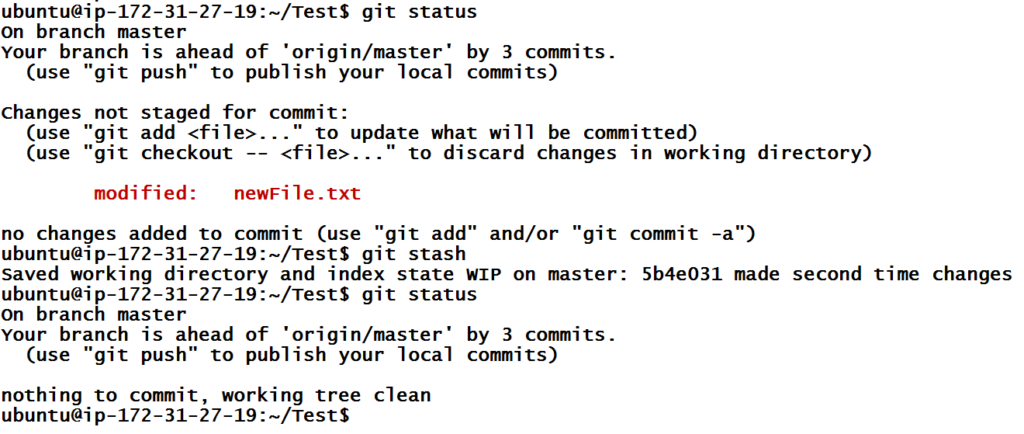
git stash will revert all the files to their previous version but whatever changes were made to these files will be saved in the stash list. This log can be seen using git stash list command.
You can verify this using git diff which will print nothing as there is no difference between the previous commit and the current state of the files.

As we can see, there is only one entry in git stash because we ran git stash command earlier. Stash list is universal across all branches. One cool thing about stash is, we can re-apply these changes back using git stash apply entryIndex where entryIndex is index of entry in stash.
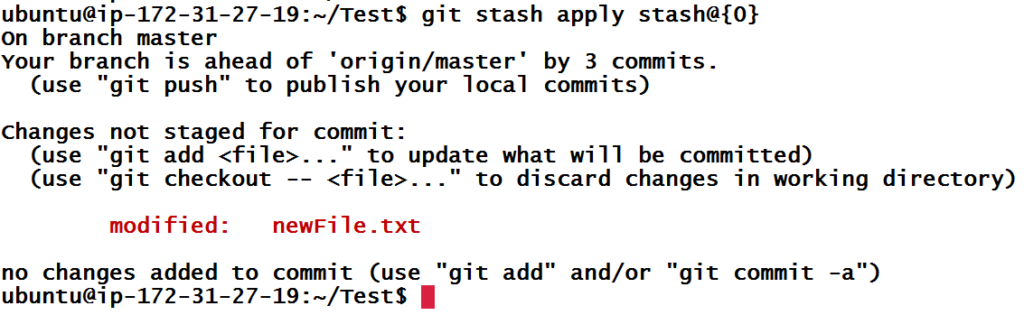
Above the command will apply changes available in stash{0} to files in current branch. Above results confirm that.
But we can see that, git stash list still has that stash entry. While applying a stash, if you also want it to pop (apply and delete) up from the list, use the command git stash pop entryIndex.
To clear or clean all entries in stash list, use the command git stash clean.
Let’s say that we have made some changes in master branch and we want to stash it. Then we will switch the branch to dev and apply that stash from there. But in between, lots of stashes can happen in other branches and we won’t remember the stash index. Hence we need to save it using some short name or description. This is possible with the command below.
git stash save stash-name
Merge conflicts
You can’t avoid a situation when you have made some changes to a line in a file and somebody else also have made changes to the same line in the same file. If the other developer has published his/her changes to the remote repository and you are trying to publish your changes after that, Git won’t allow you to publish your changes. This happens because Git is confused whether your changes are important or somebody else’s.
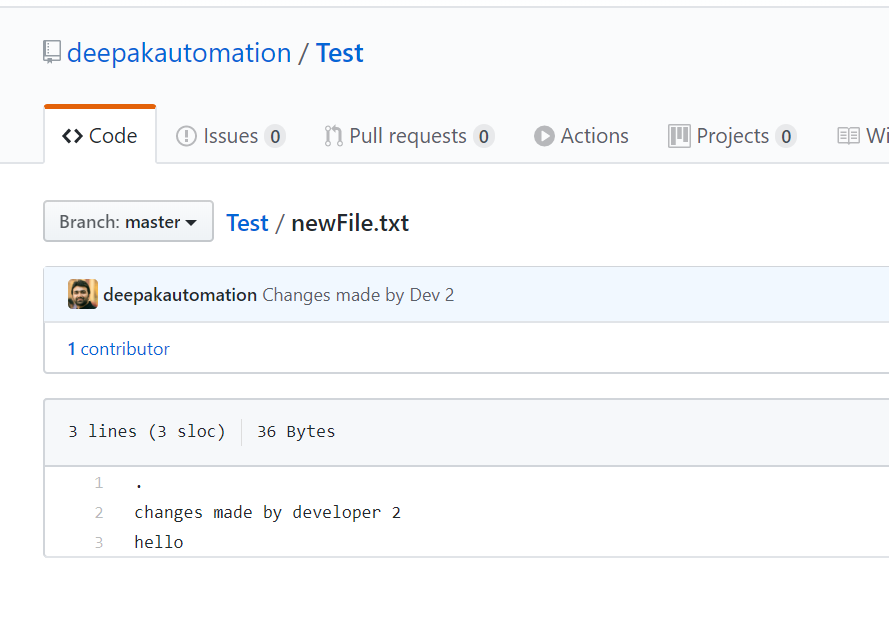
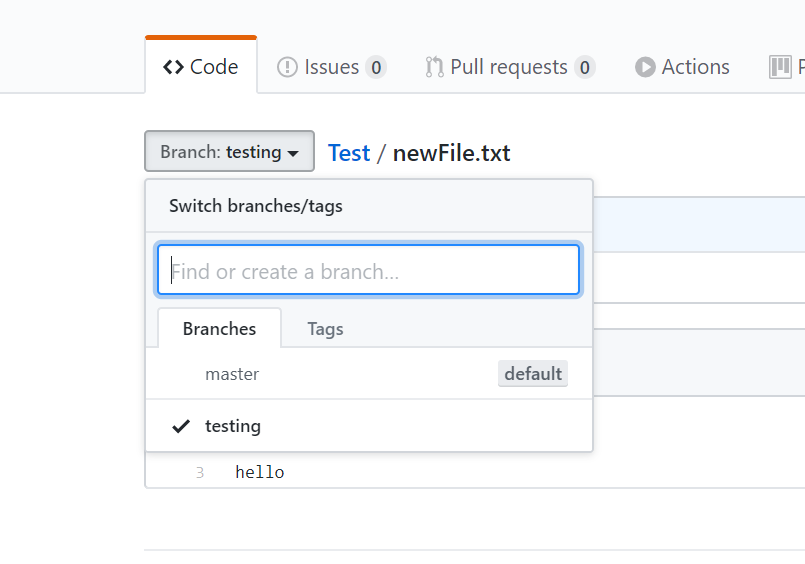
Let’s simulate this state of affairs. Let’s go to remote repository and change something there. GitHub provides a very easy to use UI to make changes to a file.
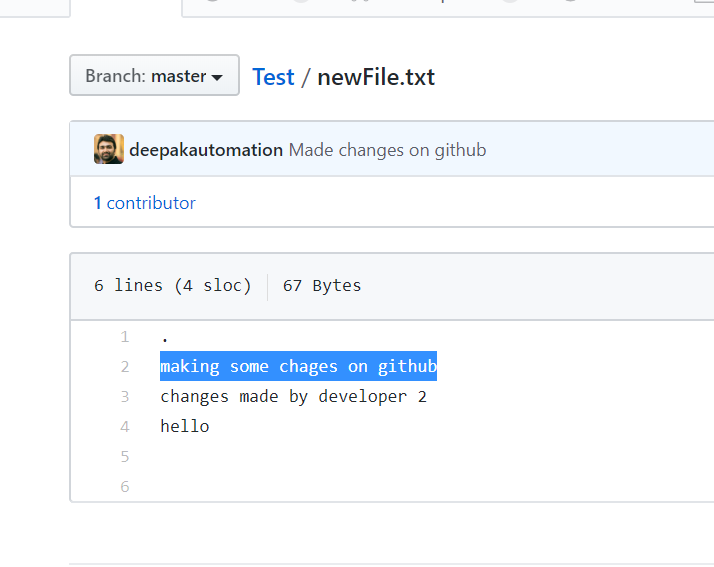
From the above screenshot, I have made a commit in remote repository by modifying newFile.txt file’s first line and we don’t that have commit in our local repository. Now, let’s make similar changes in local repository.
Since we are done with our changes and we don’t have any idea if somebody else has worked on same line of same line, we are going to make a commit.

Now, let’s try to push it to the master branch of the remote repository.
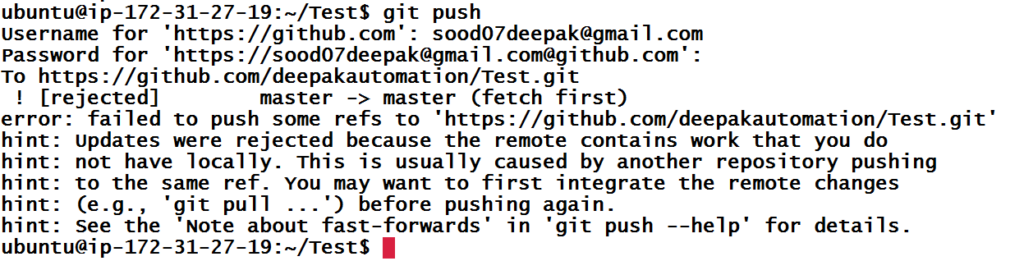
Wow, something went wrong. From the error message, we can tell that push was unsuccessful and some ref (changes) on remote repository conflicts with our changes. Hence, first we need to bring those changes (commits) in our local repository and deal with them. We will use git pull to sync the remote repository’s master branch with local repository’s master branch.
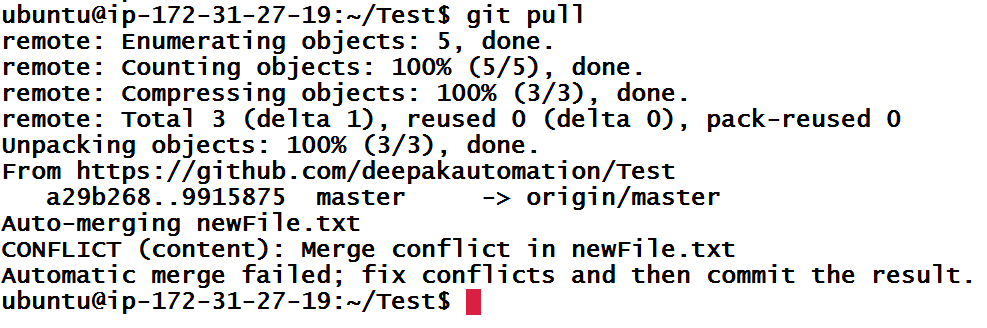
Git pull shows that there was a merge conflict in newFile.txt file.
If you are asking why it is showing merge conflict because we did not use git merge command but that’s what Git does when you use git pull command which is equivalent of git fetch && git merge origin/master. So, it is merging of remote/master branch with master branch.
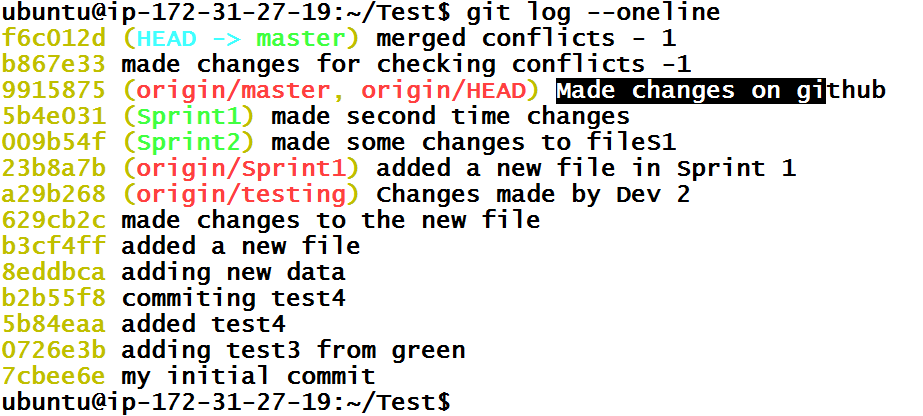
When there is merge conflict, Git will will add conflicting changes contained remote repository to the file(s) rather than adding commits to Git history. Hence, git log will print the same history you had before the git pull.
Since some files are changed, you can see these files in staging area.
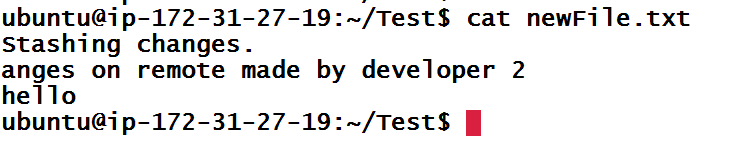
git status also prints that we have merge conflicts and we have some unmerged paths in newFile.txt. Let’s see how newFile.txt looks like.
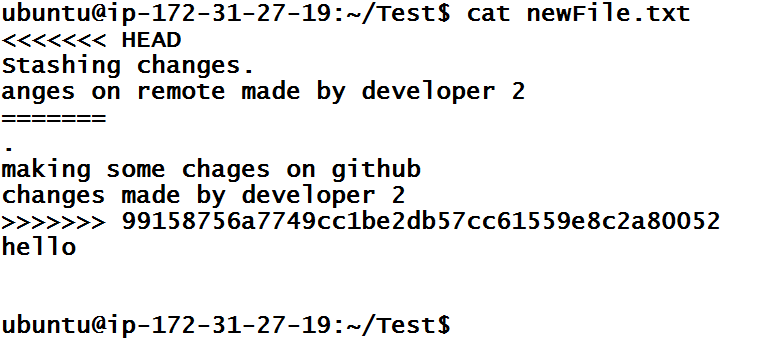
To fix this, you need to remove these markers and make a choice on which line is important. I feel that, my line makes more sense and other people approved it, hence I am going to put things as they were before the merge.
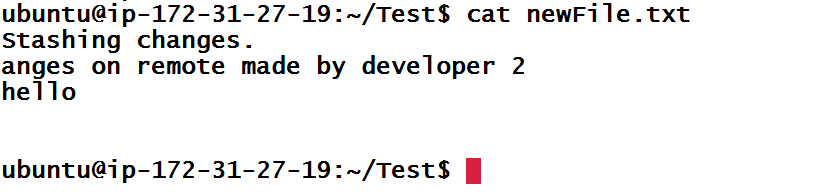
Now that we made changes to newFile.txt file, we have to create another commit. When we will create commit from conflicting file, Git will automatically add conflicting remote commit to the branch.
Now, we can push these commits to remote repository and git push hopefully will work just fine.
What we saw is just one way to solve merge conflicts. Also you can use git merge --abort (git reset --merge for older Git versions) to abort the merge when you do git pull, which will remove conflict markers from the file. But you still have merge conflicts when you do git pull next time.
Merge conflicts can happen at any time and you should be ready for them. One common safe practice is to always keep your local branch in sync with the remote branch by doing git pull. Also, keep pushing commits as soon as you are done with them. That will minimize conflicts by a large extent.
Git Rebasing
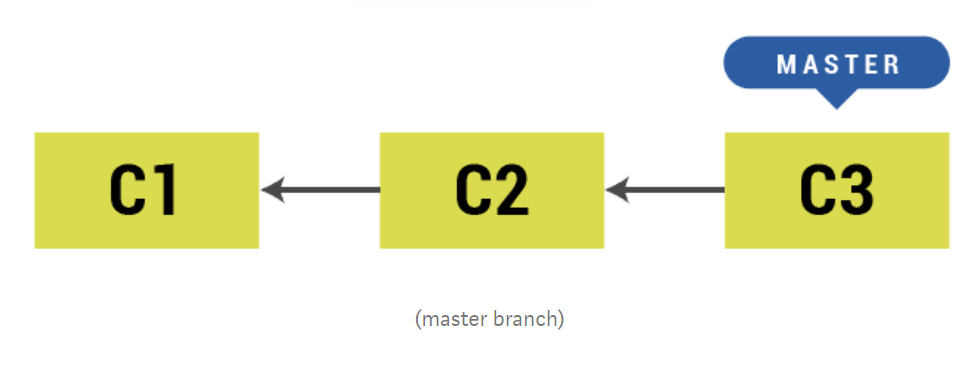
Let’s understand first how merges happen. Let’s say, first we have a master branch with three commits.
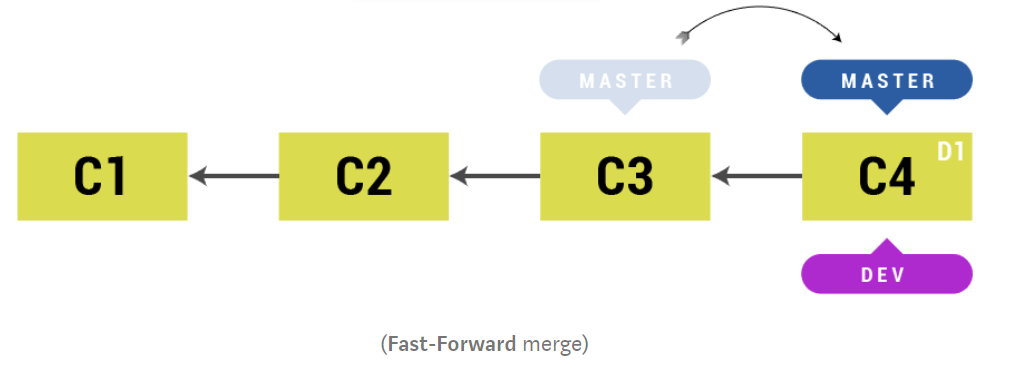
When we create a new branch dev from master, the new branch is simply referencing last commit from master branch. We can add new commit in dev branch and merge dev with master branch, then our master branch simply points to last commit of dev branch. This is also called as Fast-Forward merge because it simply moves the HEAD of the master branch to the commit of dev branch.
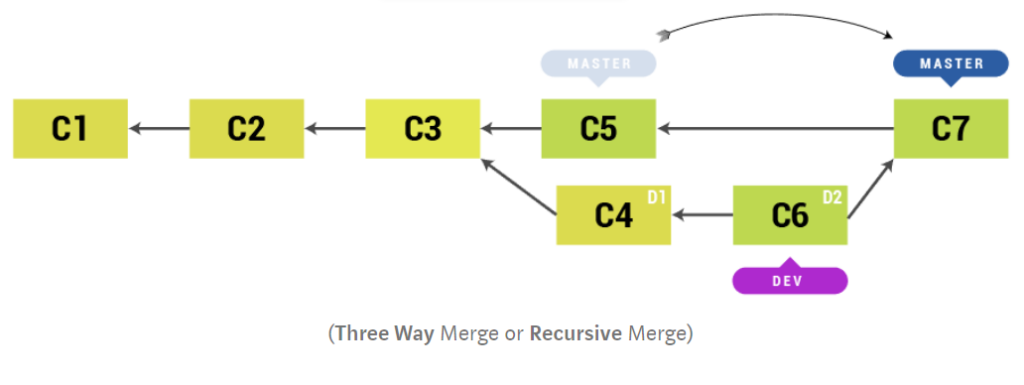
But while we were in dev branch and new commits were created in the master branch, then Git creates a new merge commit based off of latest commit in master branch and latest commit in dev branch (along with the commit in master branch from which dev branch was branched off). Then master branch will simply point to this new commit. This is called as Three Way Merge or Recursive Merge.
From merge console log, you can see which merge it was .
There is third kind of merge but it is not exactly a merge. Instead, it is copying commits from a feature branch (in our case dev) and lying on top of main branch (in our case master). You can compare it with three way merge visualization in the previous example
Let’s see with an example. First let’s add two new commits in dev branch and then one new commit in master branch.
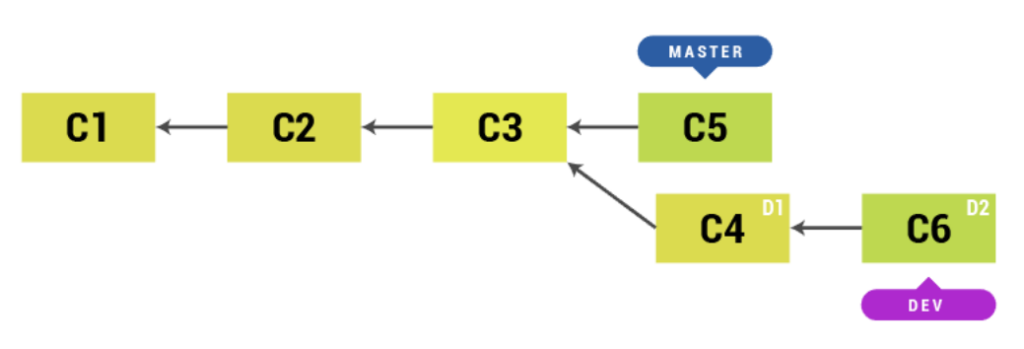
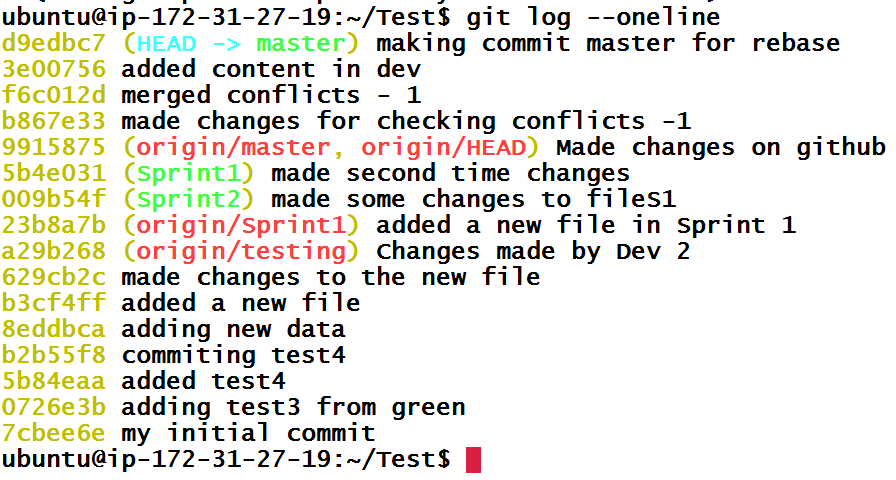
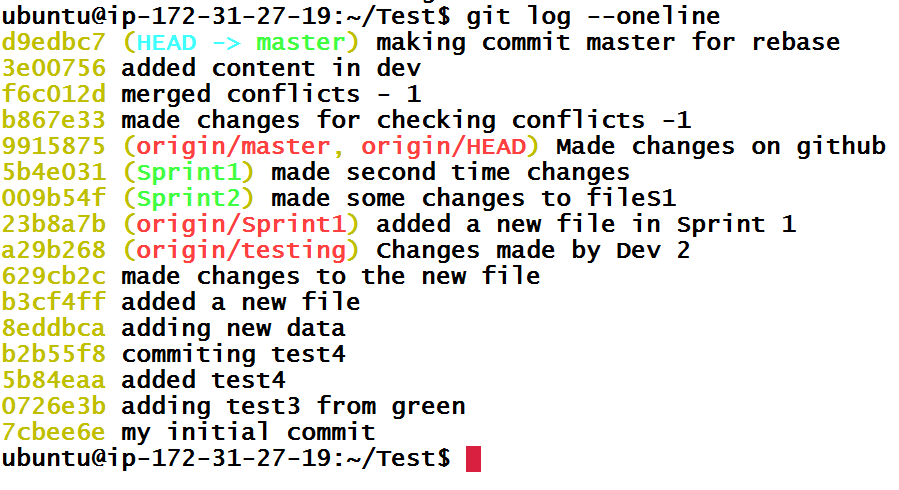
We know what merge will do, Git will create a three way merge when we merge dev branch to master branch. So far my Git history of master branch looks like this.
Now, let’s merge dev branch in master with git merge dev when we are inside master branch.
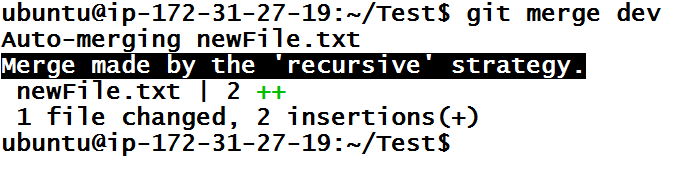
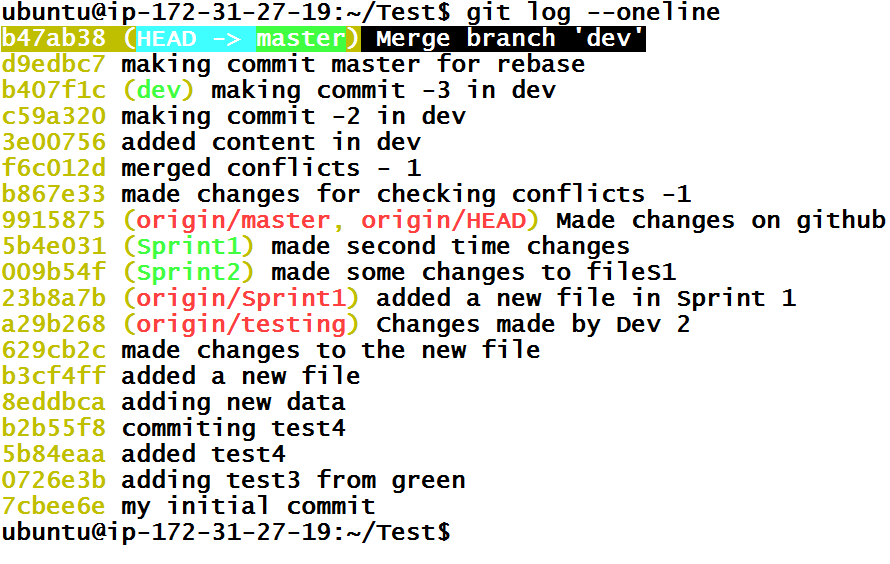
We can verify that it was a three-way or recursive merge. Git simply created a new commit based off of last commit in master branch and last commit of dev branch.
But that’s not what we are here for. I am going to reset master branch to the commit before the merge which has hash d9edbc7 with command git reset --hard d9edbc7.
Now, let’s do rebase. When we run command git rebase dev from master branch, it will copy all commits from dev branch and put it on top of the master branch. This can also change the hashes of commit because Git can’t simply lay commits on top of each other. It will adjust any other commits to make a simple straight line tree.
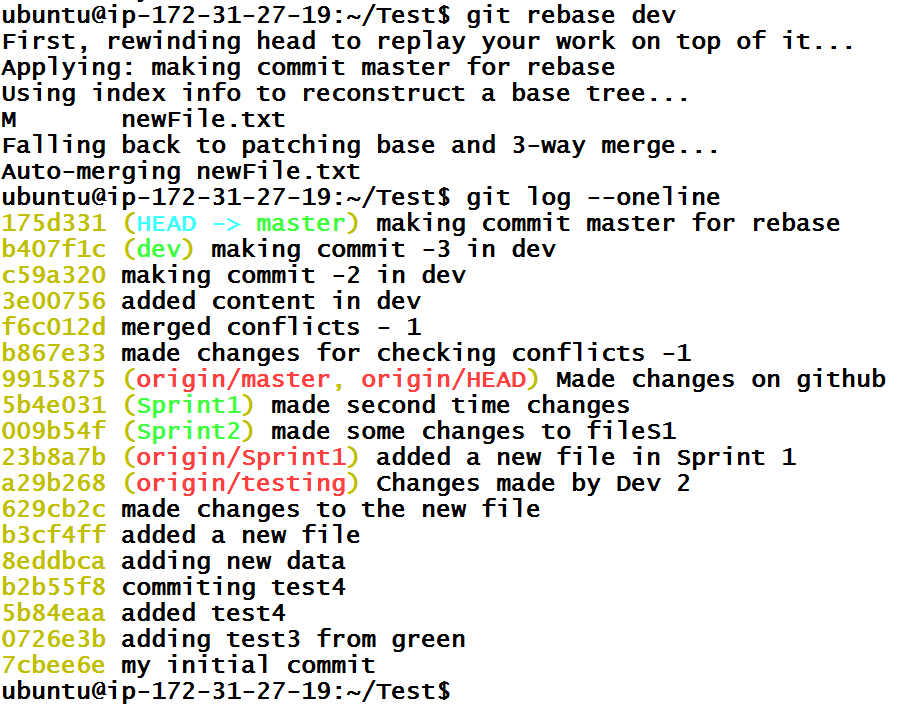
From the above tree, we can see that it was rebase instead of merge and the tree looks very simple. Now we can push master branch to the remote repository.
The primary reason for rebasing is to maintain a linear project history. But you should never rebase commits once they’ve been pushed to a public repository. The rebase would replace the old commits with new ones and it would look like that part of your project history abruptly vanished.
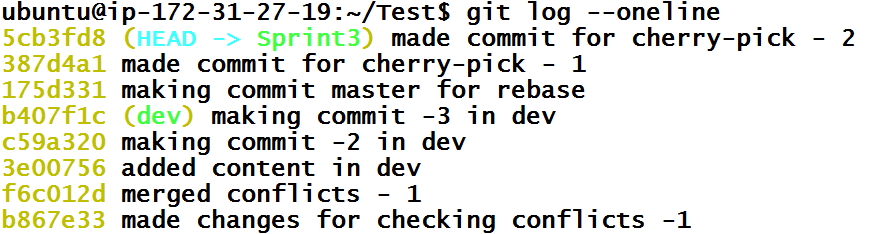
Cherry-Pick
We have seen so far that if you are working with a team of people, then you should not touch the production branch which in our case is master. But what if you accidentally forgot to switch branch and made commits inside the master branch? You can’t just remove your commits using git reset and redo the work. That would be painful. In that case, we could use couple of techniques including cherry-pick.
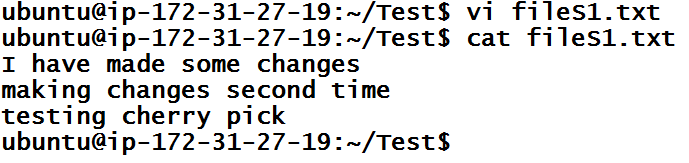
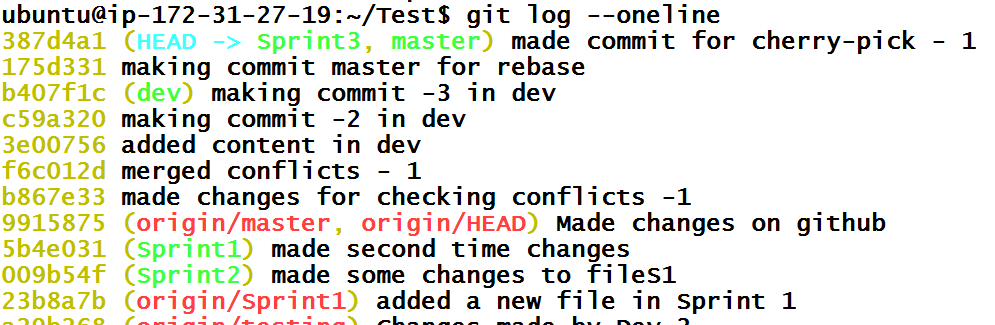
Let’s first create a commit inside the master branch. I am going to add some comments inside fileS1.txt.
We are going to make a commit from only this modified file, hence I will use the shorter version of the commit command.

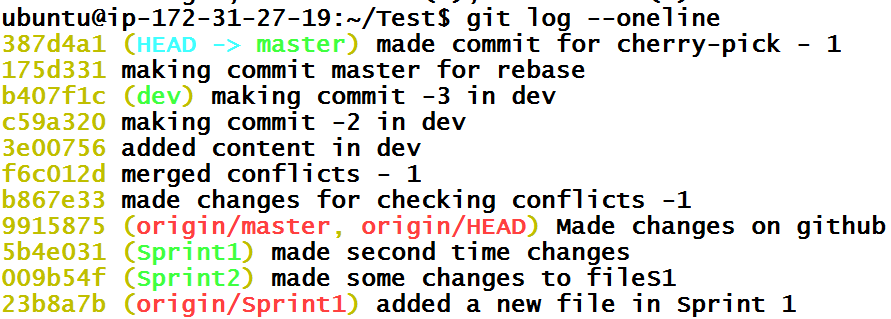
Our Git history shows that commit. But, suddenly we remembered that we were doing commits in the wrong branch. We can’t push this commit(s) to the remote master branch. We need to get rid of commit 387d4a1 and return master branch to the state it was before. But we also don’t want to delete this commit because it contains our work.
What we were supposed to do is create a new branch Sprint3, make changes there and publish that changes there. Later, if changes are approved, merge in master branch. So, let’s do that. Let’s make Sprint3 branch first and execute checkout. I am going to use a shorter version of the checkout command.

Now we are inside the Sprint3 branch. If we see history of git branch, it should have commit 387d4a1 from master branch.
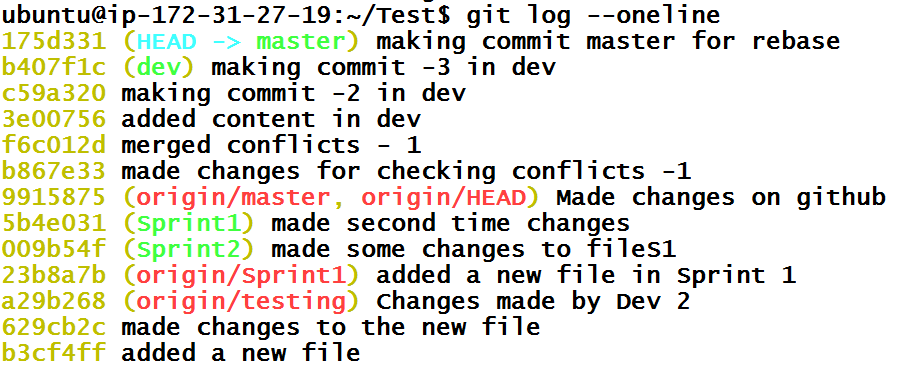
Great. Now we have to go back into the master branch and set HEAD to the commit 175d331 which is second commit in history.

The git history of the master branch now will look like
Now, we just have to go back into Sprint3 branch, push commits to remote Sprint3 branch and wait for approval. Let’s say that we got approval the changes are ok. It’s time to merge Sprint3 branch to the master branch.
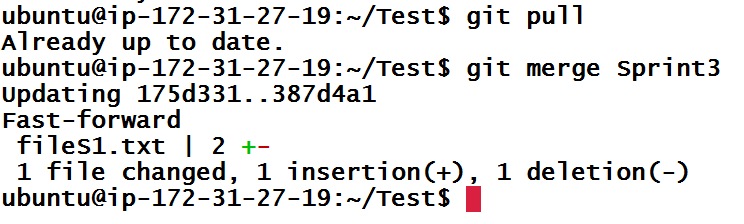
And we got our commit back from dev branch. Now we can push this commit using git push.
Let’s think of another situation. What if we made commit(s) in the master branch by accident and we also have the Sprint3 branch present? We could create another branch besides Sprint3, which we did, but let’s assume that we must work in Sprint3 branch. Then somehow, we have to bring the commit from master branch to Sprint3 branch. Let’s see how we can do it. Let’s first create a commit inside the master branch.

Let’s create a commit and the see the git history.
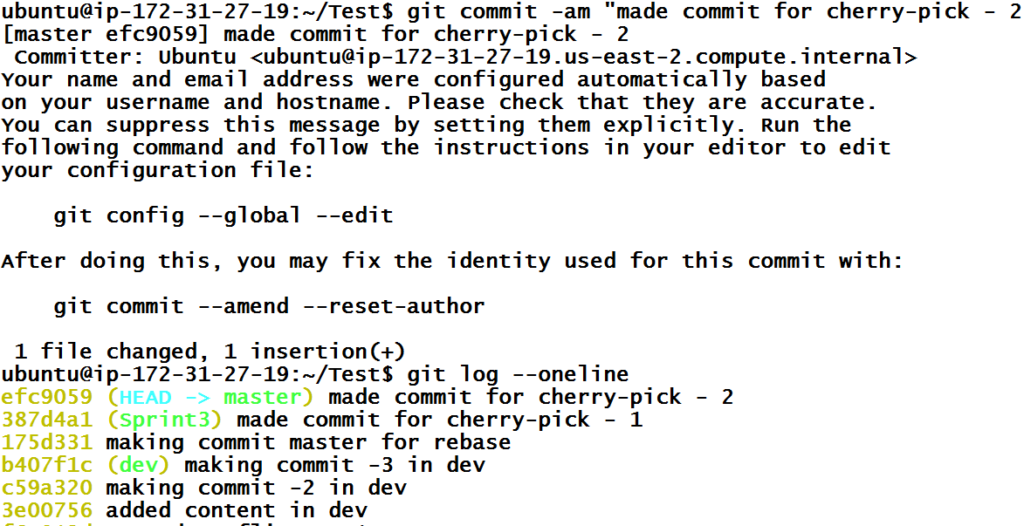
Since we don’t want commit efc9059 in the master branch and we want to move this to Sprint3 branch, let’s checkout the Sprint3branch.

Git history of that branch doesn’t have the efc9059 commit which should be obvious by now because conducted a checkout of already existing branch. Now, we have to bring this commit from the master branch. Commits do not belong to any branch. They are unique and branches only reference them. Hence, we can just instruct Git to bring the efc9059 commit without telling from which branch or branches reference it. This is done using cherry-pick.