Till now we have seen that we can manage the configuration of ansible at path /etc/ansible/ansible.cfg file. You can create your own configuration file. The order of the configuration file will be as follows with the defined location given in the image below:
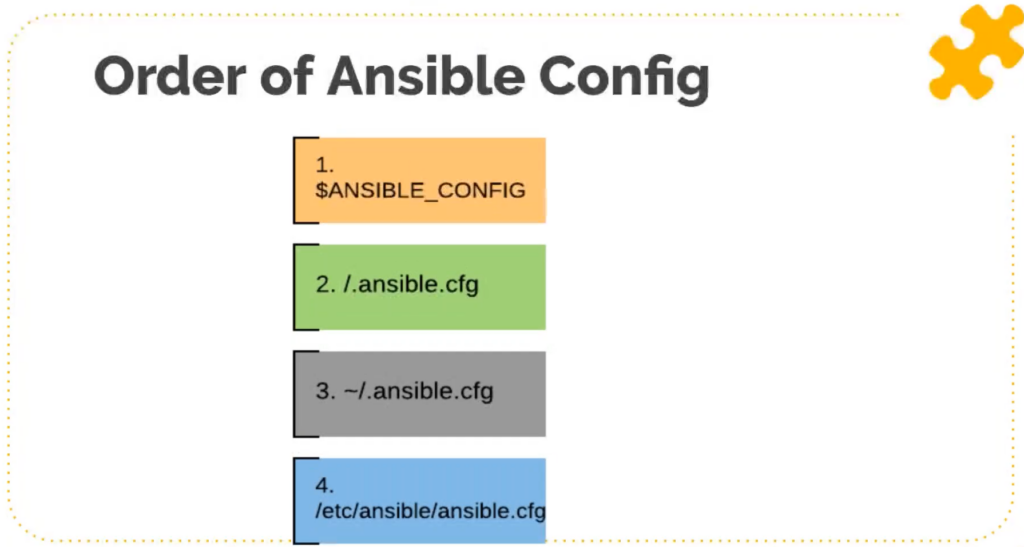
- We can set a variable and define any path and use it. This has the highest priority.
- We can create the .ansible.cfg file in the same directory where we keep our playbook as well. We will be using this local configuration file for our tasks in this article.
- We can create the .ansible.cfg file in the home directory starting with dot(.) so it will be a hidden file.
- This is the default global Ansible configuration file from where in the previous article, we changed the host key settings to false which is enabled by default.
By default ansible uses level 4 configuration file, however if we want to make some change to the configuration file, it is preferred that we should be creating file in the current directory where the playbook will reside.
So now, let’s see some of the common global Ansible settings in the Ansible machine.
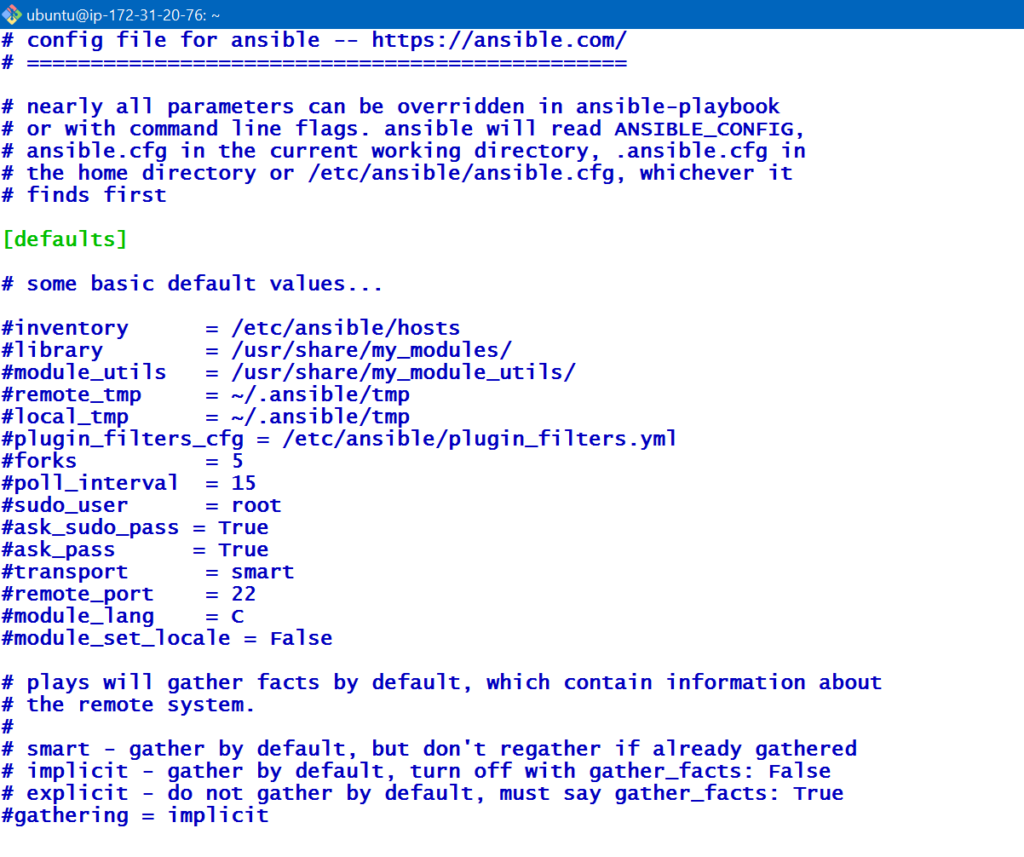
We can see we have a lot of options here which we can change.
- Inventory
Here, every time we execute the Ansible command, we have to give the inventory path. Here, in the default section, we can give the path of the inventory. Then, we don’t need to give -I option while executing the Ansible command. - Forks
Suppose we have 100 machines and if we want to do parallel execution for, suppose, 10 instances at a time then we can change the value of the fork to 10. So now it will make 10 SSH/ winrm /API connections at a time but make sure that your Ansible machine has good resources like RAM, CPU. - Ask_pass
If we don’t want to mention password in the inventory file for hosts and if we don’t want to do the key exchange as well, then we can enable this option and it will then ask for the password. This is not recommended for automation. - Remote_port
The SSH default port is 22 but if we are running SSH on a different port on the target machine. Then, we can change this value as by default Ansible tries to connect through SSH using port 22. For security reasons, we sometimes change the default ports.
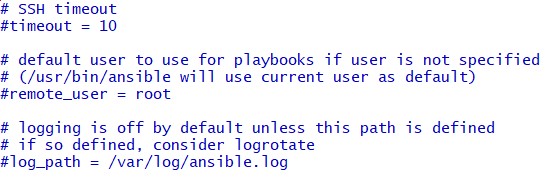
- SSH_timeout
We can change the SSH timeout value from this global configuration file. By default it’s 10 seconds so if a target machine will not respond in 10 secs then ansible will move to the next target. - Remote_user
In the previous article we specified the user as DevOps but here, we can also change the remote user. - Log_path
Ansible does not store logs by default, but if we want to store logs then we can specify the log path. We also have to make sure that the file specified in the log_path should be owned by the user who is executing ansible.
And there are lots of other settings like inventory specific, privilege_escalation and more. We can check the detailed ansible configuration here.
Creating your own Config File
vim ansible.cfg###############ansible.cfg##################
[defaults]
host_key_checking = False
inventory = int-qa
timeout = 15
log_path = /var/log/ansible.log
[privilege_escalation]
become = True
become_method = sudo
become_user = root
become_ask_pass = FalseNote
Here, we have renamed our inventory file from inventory to invent using the below command.
mv inventory int-qaNow, as we have given log_path for the Ansible log but we don’t have that file created. So, we are going to create the Ansible.log file and will change the ownership for Ubuntu user with the below commands, so that the logs can be added to this file.
sudo touch /var/log/ansible.log
sudo chown ubuntu:ubuntu /var/log/ansible.log 
TIP: As we have defined the inventory file inside the local Ansible config, so now we can execute ping on all the servers without giving the inventory path as opposed to earlier when we had to pass the inventory file. So, the shortened new command will look like below.
ansible -m ping websrv01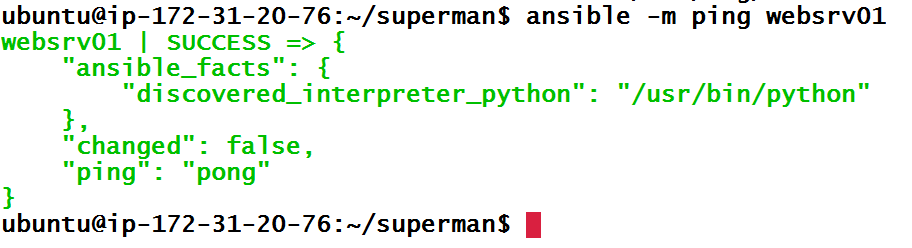
We can see that ping has executed successfully on all servers. Now, let’s do one more thing and install one more service called NTP on all servers using Ansible package module. The below command will install NTP service on all the servers without giving –become command as we have defined all this configuration in our local ansible.config.
ansible -m package -a "name=ntp state=present" allGreat! So, by now, we have seen how we can define the configurations locally and run the Ansible modules with ease. As we have created a log file, we can also see the log file using the below command to check if logs have been generated or not.
cat /var/log/ansible.log 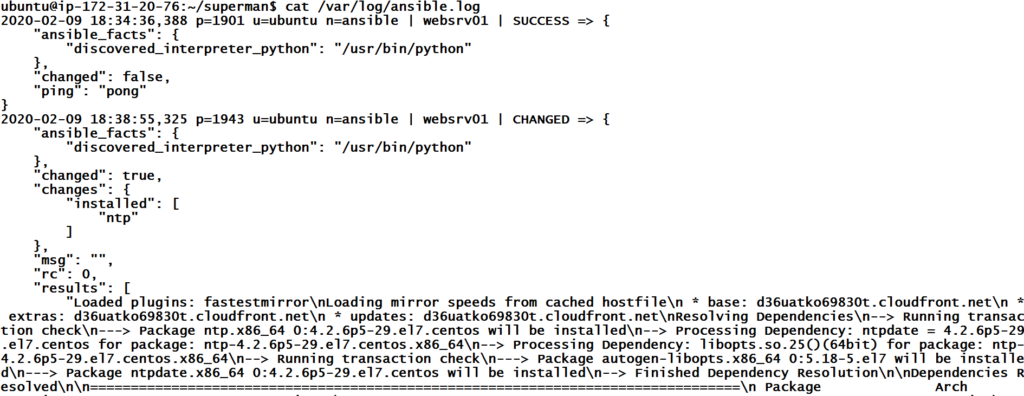
We can see that logs are being registered properly inside the log file, i.e., we are good. As everyone wants to simplify their work as much as possible, so with Ansible, we have something called Playbooks. Let’s discuss about playbooks in the upcoming article.